Neapolitan Cupcakes!

*This post may contain affiliate links. Please see my disclosure for more details!*
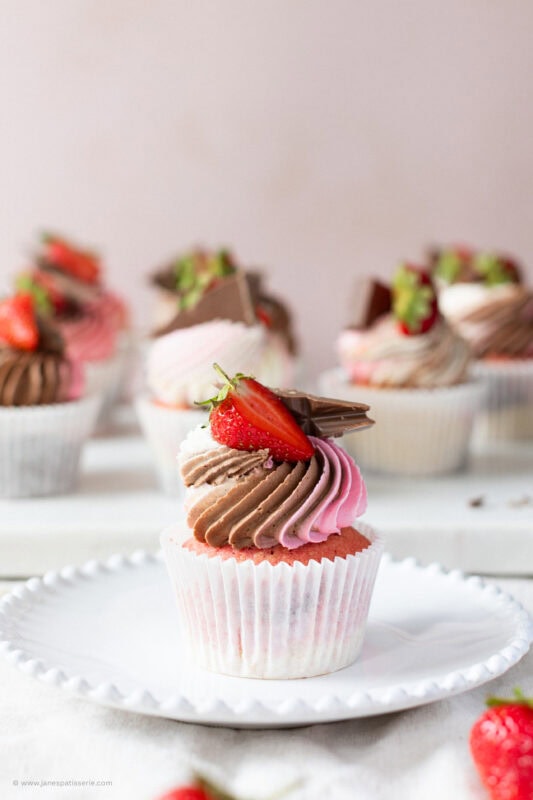
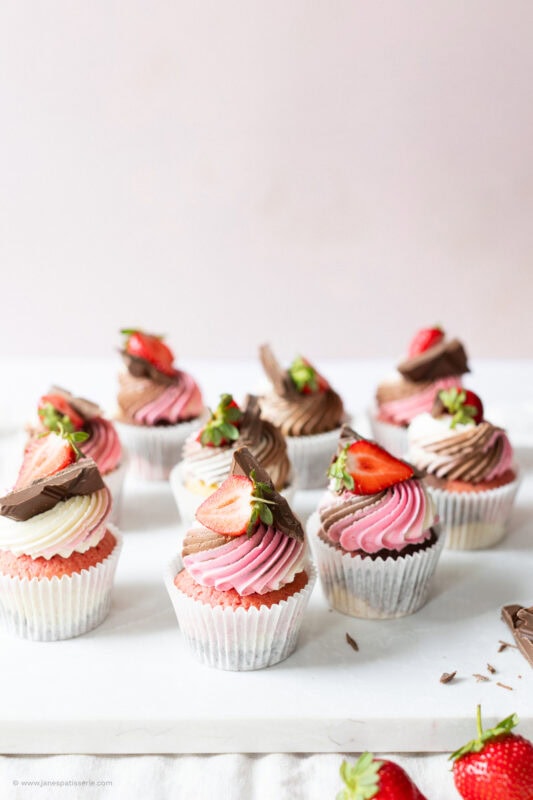
Three layers of flavour in one adorable cupcake. Chocolate, strawberry and vanilla sponge, topped with swirled buttercream and the cutest decorations!
Neapolitan favourites
I don’t think I’ve ever had a cupcake request quite as persistent as this one. Honestly, I’ve lost count of how many of you have begged for Neapolitan cupcakes! So naturally… I caved. And I’m so glad I did. I’ve made these a fair few times now for family, taste testers and, let’s be honest, for myself, and every single batch just confirms how much I adore them. It felt about time I finally shared them with you lovely lot.
Just like the classic ice cream, these cupcakes bring all three flavours together in one bake and it really is the ultimate combination. The bright, contrasting colours are fun, nostalgic, and utterly irresistible. They’re perfect for a summer BBQ, a kids’ birthday party, or really any occasion where you want a little bit of fun and a lot of deliciousness. Honestly, once you taste them, you’ll be looking for any excuse to make them again.
Neapolitan nostalgia
After sharing my No-bake neapolitan cheesecake and my neapolitan macrons, I had a feeling you’d go wild for the cupcake version. And honestly? I didn’t even like the strawberry section of Neapolitan ice cream when I was a kid. I would scoop around it dramatically because chocolate was always my favourite. Now I’m grown up (sort of), and probably far too excited about cupcakes, I actually love the combination of all three at once. It’s dreamy.
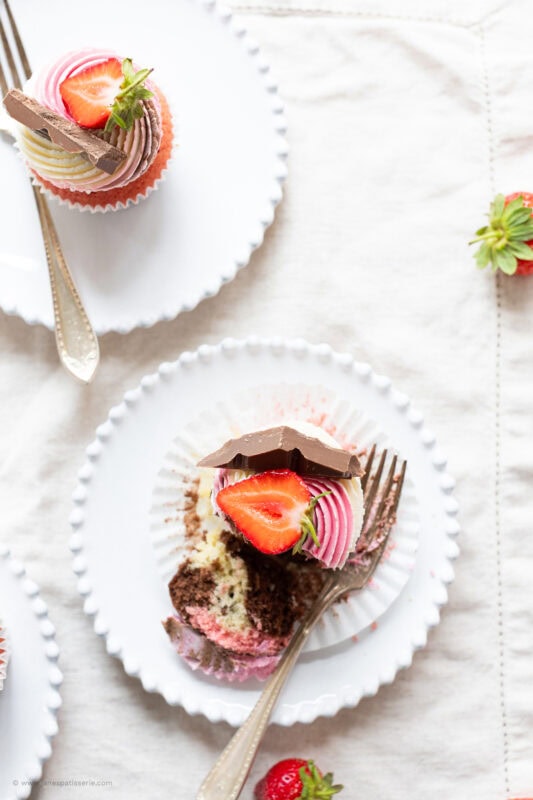
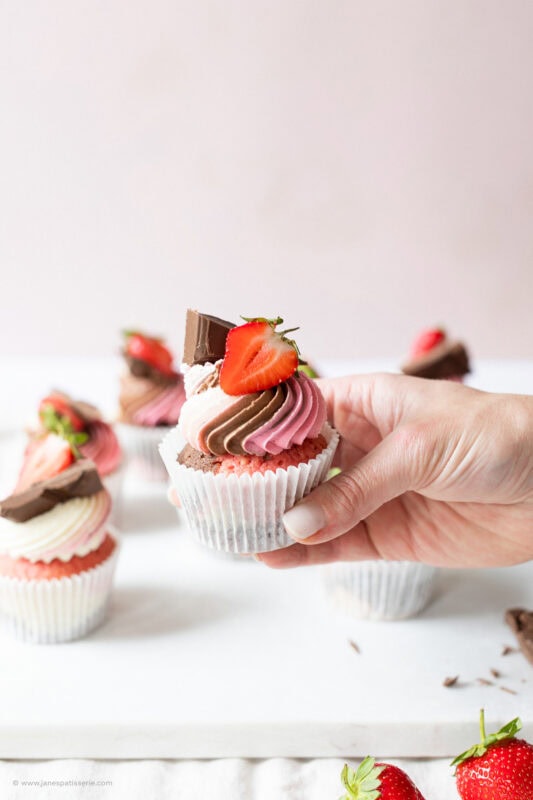
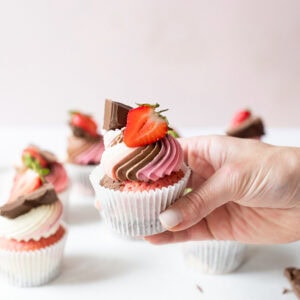
When you bite into these cupcakes, you get the perfect combination of textures and flavours. The sponge is soft and fluffy, the strawberry section adds a subtle, sweet fruitiness, the chocolate brings that rich, comforting depth, and the classic vanilla balances everything beautifully. On top, the swirled buttercream not only looks stunning with its bright, cheerful colours, but also adds a creamy, melt-in-your-mouth finish that ties all the flavours together. Every bite is a little moment of joy, light, indulgent, and absolutely satisfying, making them impossible to resist.
Sponge
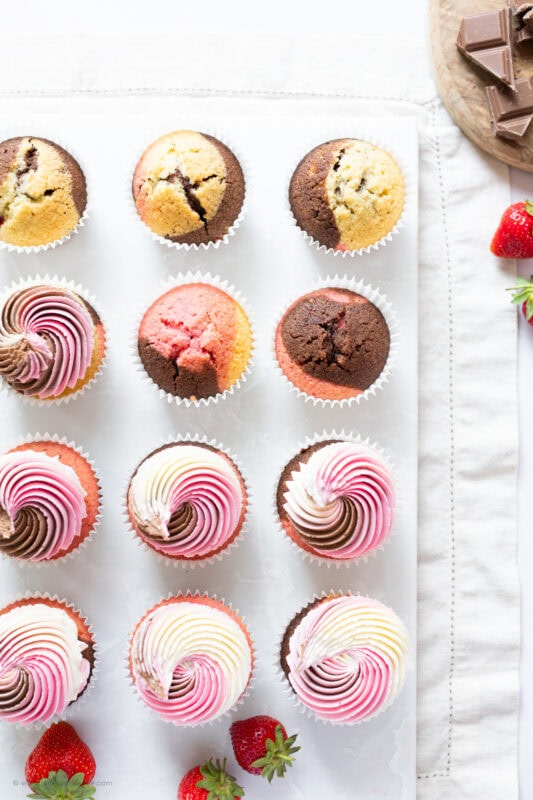
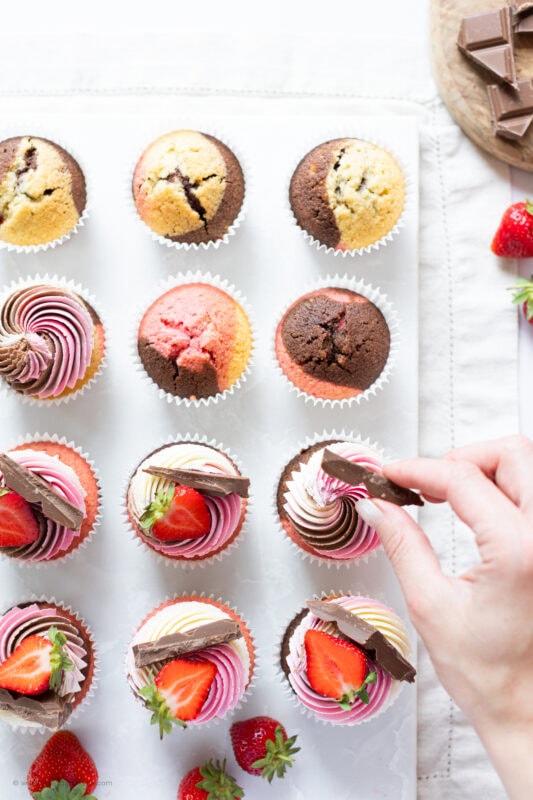
The sponge follows the same idea, three little bowls of mixture, each flavoured separately, then spooned into the cases so you get a bit of everything in each cupcake. It’s not an exact science (and doesn’t need to be!), but the marbled, colourful look once they’re baked is so satisfying.
The sponge itself is honestly so fun to put together. Once you’ve mixed up your base mixture, you simply divide it into three bowls and flavour each one differently… chocolate, vanilla and strawberry. It’s such a simple process, but the transformation is so satisfying.
For the strawberry portion, you can use fresh strawberries or a strawberry purée, but I personally find that only one section ends up lumpy, which throws off the texture a bit. Coulis or a good-quality strawberry jam works far better because it stirs through smoothly, adds that gorgeous sweetness, and keeps the mixture silky (top tip… I add food colouring so the flavour is instantly recognisable as strawberry).
For the vanilla layer, I stick with a classic vanilla extract for that sweet bakery-style flavour, and the chocolate layer gets a little cocoa powder mixed in to keep things rich but not too heavy. Chocolate, strawberry, vanilla… all in one bite. What’s not to love?

Buttercream
Let’s talk about the swirl, because this is the bit everyone gets excited about. To get that perfect tricolour buttercream, I used three small disposable piping bags (one for each flavour) inside one large piping bag fitted with my trusty 2D closed star tip. Yes, it’s a bit bag-heavy… but honestly, it’s the easiest and neatest way to get that clean swirl.
If you want to simplify things, you can scrape all three buttercreams into the big piping bag and hope for the best, it gives a more rustic look, which is actually very cute. Or you can pipe the layers one at a time for a stacked stripe effect! There’s no wrong way to do it, and I promise it tastes heavenly whichever method you choose.

Decorating
I kept the decoration simple but cute, a little half strawberry here, a chunk of roughly cut chocolate there (because let’s be honest, it looks adorable!). You can absolutely switch it up depending on what you have on hand, what’s in season, or what matches your party theme. These cupcakes really lend themselves to colour, so you can get creative with different toppings, sprinkles, or even a drizzle of chocolate or fruit sauce to make them extra special. The best part is that each one can be a little work of art, and no two need to be exactly the same.
And yes… I used my favourite white baking cups because I can’t help myself. They’re sturdy, they peel beautifully, and they make everything look instantly more ‘showstopper’. Regular cupcake or muffin cases work perfectly too though. That said, you absolutely don’t need anything fancy, regular cupcake or muffin cases work perfectly well too. The important thing is that the cupcakes taste amazing, and with or without the fancy cases, they’re guaranteed to be a hit with anyone who tries them.
Tips & tricks
- You could use strawberry flavouring if you wanted, or fresh strawberries, but that would make only one section of the cupcake lumpy. I use coulis or strawberry jam to give it a bit of flavour as its easier and then some food colouring for the colouring as its such a good colouring brand.
- I went for swirling the buttercream together by using some disposable piping bags inside a larger disposable piping bag.
- You could easily swap the flavours up if you want a different trio of flavours – or you can pipe on the buttercream in layers for example rather than swirling them together.
- These cupcakes will last in an airtight container/cupcake box for 3 days at room temperature.
- I buy my cupcakes cases from here.
- And my 2D closed star piping tip.
Neapolitan Cupcakes!
Ingredients
Neapolitan Cupcakes
- 150 g unsalted butter/baking spread
- 150 g caster sugar
- 3 Medium eggs
- 150 g self raising flour
- 15 g cocoa powder
- 2 tbsps strawberry jam/fruit coulis
- pink food colouring
- 1 tsp vanilla extract
Neapolitan Frosting
- 150 g unsalted butter (room temp NOT baking spread)
- 300 g icing sugar
- 15 g cocoa powder
- 2 tbsps strawberry jam/fruit coulis
- pink food colouring
- 1 tsp vanilla extract
Decorations
- strawberries
- chocolate pieces
- sprinkles
Instructions
For the Cupcakes
- Heat your oven to 180ºc/160ºc fan and line a cupcake/muffin tin with 12 Large cupcakes cases/muffin cases or a large tray with 12 Regular baking cups like I have!
- With a stand mixer – Beat the unsalted butter/baking spread with the caster sugar until light and fluffy – Combine the eggs and self-raising flour with the butter/sugar mix until well combined. It won’t take too long to mix!
- Separate the mixture into three bowls – it’ll be roughly 200g of cake mixture in each bowl. Mix the cocoa powder into one, the vanilla extract into another, and the strawberry jam/coulis and pink food colouring into the third.
- Spoon a small spoonful of one of the mixes into the cupcake cases, then a small spoonful of the second mix in, and then the third. You want to split the mixtures evenly between the 12 cupcake cases. I use a heaped teaspoon of each mixture for each cupcake case, and then use up any extra as well.
- Bake in the oven for 15-20 minutes until they’re baked through and they are springy to touch – Mine usually take 17-18 minutes! Leave them to cool fully on a wire rack (Or on the baking tray you used if you used the baking cups!
For the Buttercream
- Beat the butter with an electric mixer for a couple of minutes to loosen it – Gradually add the icing sugar on a slow speed until it is combined then speed the mixer up and beat for 5-6 minutes until fluffy and smooth.
- Split the mixtures between three bowls again. Mix the cocoa powder into one, the vanilla extract into another, and the strawberry jam/coulis and pink food colouring into the third.
For the Decoration
- In a large disposable piping bag, add the buttercream so you have it in thirds. Easiest way to do this is to use three smaller disposable piping bags with a flavour per bag. Snip the ends off and insert it into the large disposable piping bag!
- Pipe on the buttercream – I used a 2D Closed Star Piping Tip to decorate my cakes but you can do whatever you like!
- Sprinkle on some cute sprinkles, some strawberries, and some chocolate if you want! Enjoy!
Notes
- You could use strawberry flavouring if you wanted, or fresh strawberries, but that would make only one section of the cupcake lumpy. I use coulis or strawberry jam to give it a bit of flavour as its easier and then some food colouring for the colouring as its such a good colouring brand.
- I went for swirling the buttercream together by using some disposable piping bags inside a larger disposable piping bag.
- You could easily swap the flavours up if you want a different trio of flavours – or you can pipe on the buttercream in layers for example rather than swirling them together.
- These cupcakes will last in an airtight container/cupcake box for 3 days at room temperature.
- I buy my cupcakes cases from here.
- And my 2D closed star piping tip.
Hi will the jam make the sponge soggy can I use strawberry flavouring instead of the jam
Thanks
Hiya, yeah you can use strawberry flavouring if you prefer x
I’m looking forward to making these this weekend. I absolutely love your recipes.
My children loved these! Certainly a new favourite. I did find though that the strawberry part of the sponge was a little soggy, and the chocolate part a bit dry.
The chocolate icing was far too hard so I added a bit of boiling water to it.
I will make these again and make some tweaks to the recipe.
Gosh all of these recipes look amazing I would love to see you make more of them on your channel!!! Xxx