Easy Microwaveable Fudge!

*This post may contain affiliate links. Please see my disclosure for more details!*
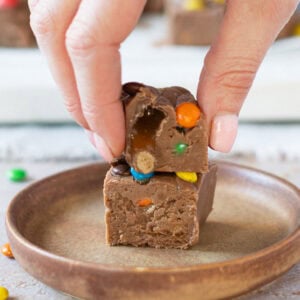
A sugary, chocolatey, delicious sweet that is setting in minutes – all you need is a microwave!
FUDGE
I LOVE fudge – that’s no secret if you see my other recipes such as my moreish rum and raisin fudge or a firm favourite, lemon meringue fudge. I wanted to try something a little different that would make making fudge incredibly easy if that’s all you wanted to do. It’s perfect for anyone who wants all the joy of fudge without any of the fuss. The combination of chocolate, condensed milk and crunchy sweets makes each piece a little irresistible bite of heaven.
Don’t get me wrong, I love making actual fudge, and its far less scary than people realise, but who doesn’t like the occasional cheats method too?! I love using this easy microwaveable method if I have little to no time… this is also the ideal last-minute bake for gifting, snacking or sharing, or even those moments when you suddenly realise you promised fudge to someone and completely forgot. Thanks to its fast setting time and minimal ingredients, you can have a full batch cooling in the fridge before you’ve even finished washing up. It’s the kind of recipe you’ll return to again and again.
“Cheats” method
Microwave fudge has become a staple in my kitchen because of how foolproof it is compared to traditional stovetop fudge. Instead of carefully monitoring temperatures and watching for soft-ball stages, all you need to do is melt chocolate and condensed milk in short bursts. Stirring between each burst ensures everything melts smoothly, and before long you’ll have a glossy mixture ready for your sweets.
What I love about this method is that it avoids the risk of overcooking. When fudge is made on the hob, it can split, burn or crystallise if you look away for even a moment. With the microwave method, you stay in complete control as the chocolate melts slowly and gently, and each stir brings you closer to that perfect creamy texture.
It’s also a wonderfully approachable technique for beginner bakers or anyone who wants a quick win in the kitchen. Because there’s no specialised equipment involved, it’s accessible, affordable and incredibly adaptable. You can use the base method for endless flavour combinations and seasonal variations.
Chocolate base
I use a mixture of milk chocolate and white chocolate for the base of this fudge recipe as I wanted it a little lighter, especially as I was adding more chocolate sweets anyway. However, you can use a mixture of dark chocolate and milk if you prefer or just all milk chocolate, it’s all down to preference. The condensed milk acts as a stabiliser, giving the fudge its famously smooth, dense texture. Once everything is melted together, you’ll have a thick, glossy base that can hold a generous amount of mix-ins without becoming too firm.
I do love a chocolate based fudge and I find everyone starts using a good fudge recipe around Christmas time especially. This one is slightly different as its a microwaveable fudge, however if that doesn’t bother you so much its well worth checking out my recipes for Baileys fudge, Mars Bar fudge and even Terrys Chocolate Orange fudge.
This recipe is also ideal for using up leftover chocolate from Christmas, Easter or birthday parties. You can switch the ratios of chocolate depending on what you have on hand, and the fudge will still set perfectly. It’s a forgiving recipe that always delivers delicious results.
Adding the sweets
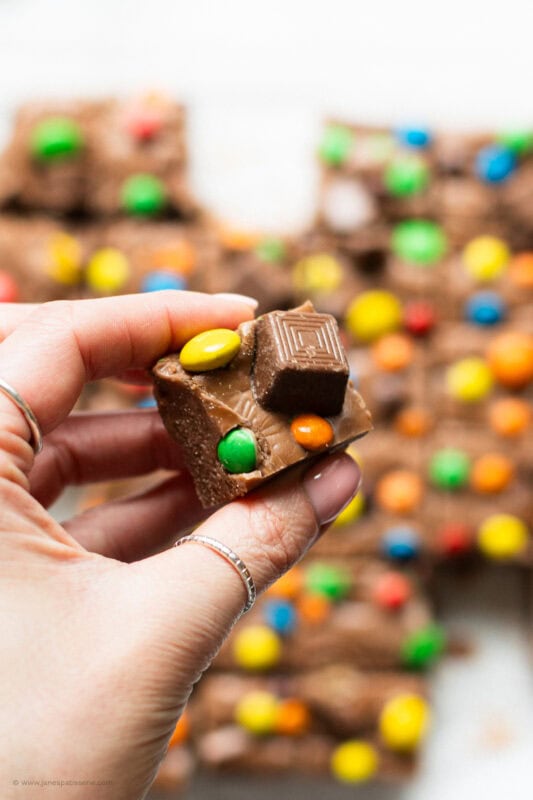
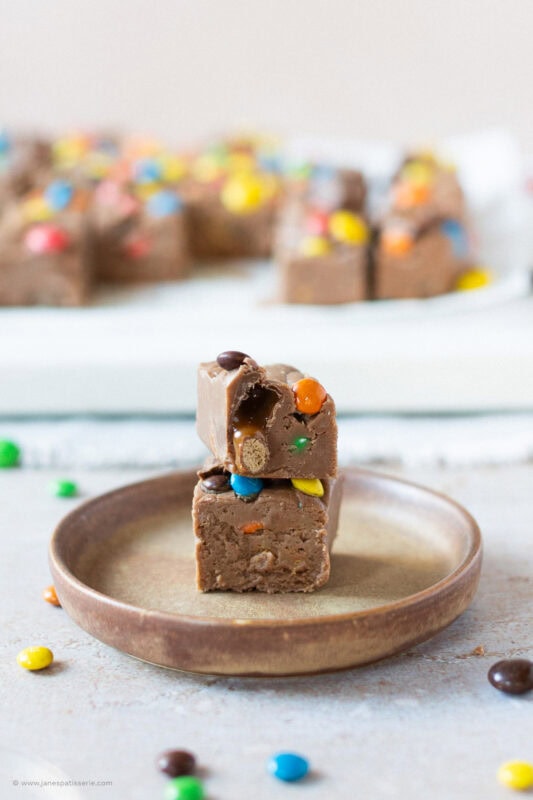
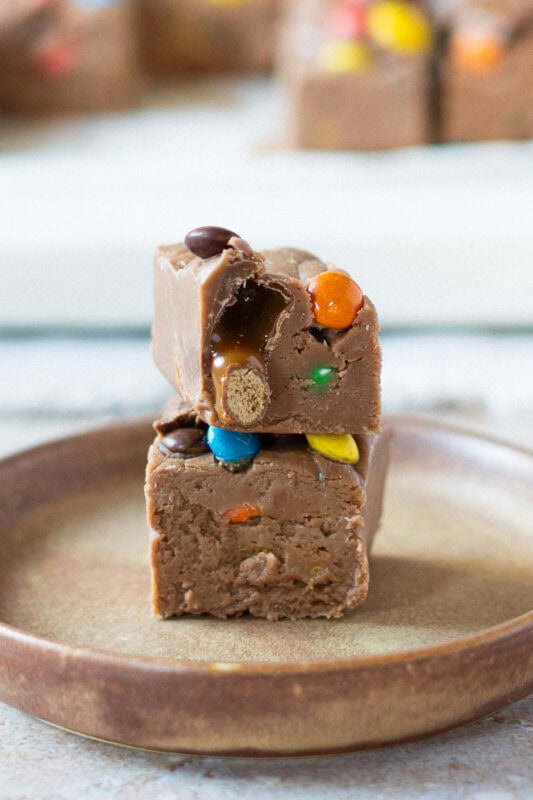
M&Ms and Rolos make this fudge especially fun, adding different textures and flavours in every bite. The crunch from crispy or peanut M&Ms contrasts beautifully with the creamy fudge, while the gooey caramel centre of Rolos melts slightly into the mixture. The combination creates a sweet treat that feels nostalgic, playful and dangerously moreish.
You can use any type of M&Ms, chocolate, crispy, peanut or even the brownie versions, which work surprisingly well. Rolling the sweets into the warm fudge ensures they distribute evenly, giving every square a generous amount of colour and texture. Adding them while the mixture is still warm helps them stick without melting completely.
This section of the recipe is also the most customisable, making it perfect for clearing out your chocolate stash. Maltesers, chopped Mars Bars, Smarties or even broken bits of Easter eggs work beautifully. It’s a brilliant way to prevent chocolate waste while creating something delicious.
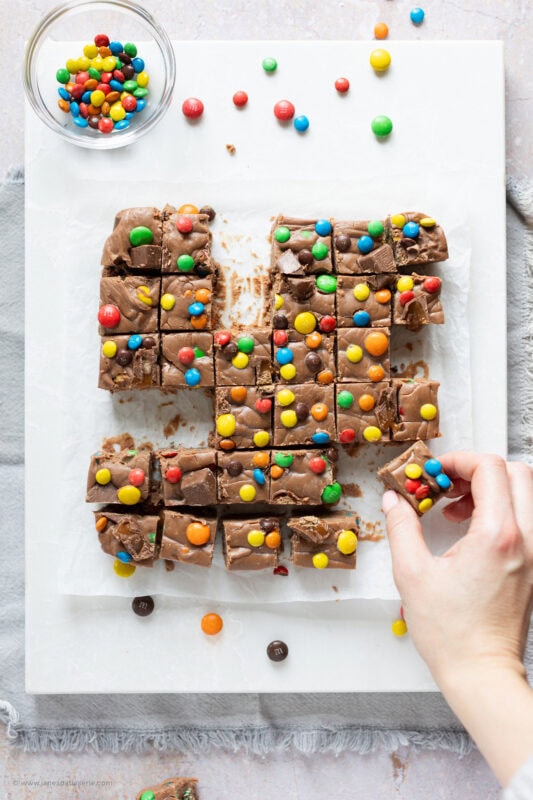
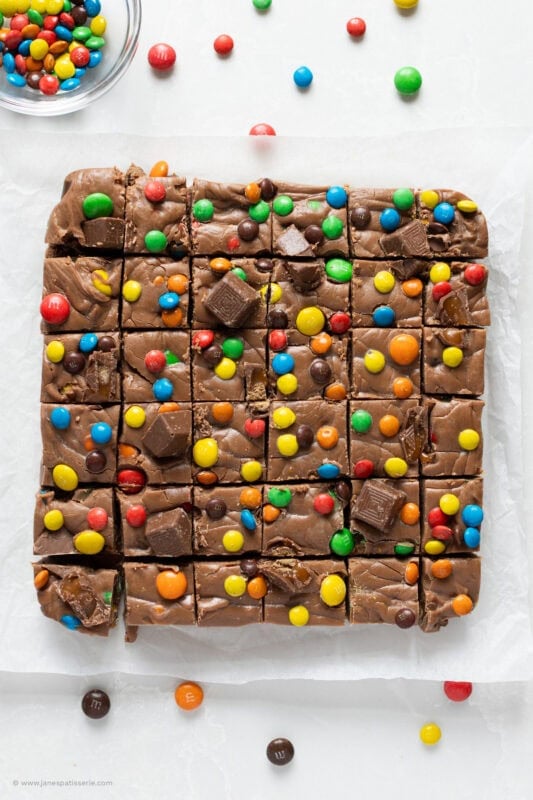
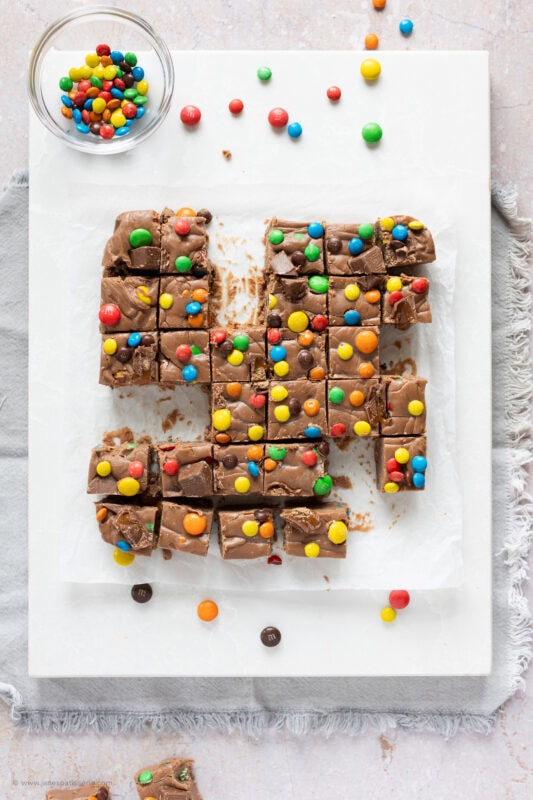
Setting and slicing
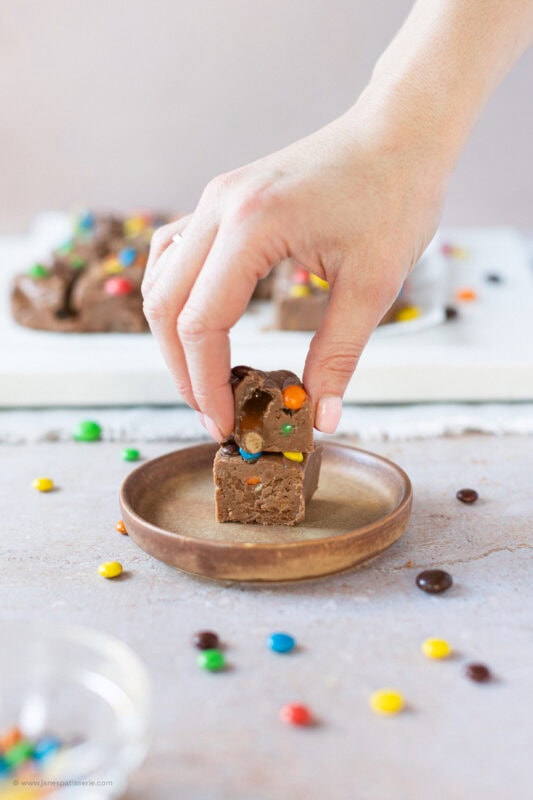
Once the mixture is poured into the tin, the fudge needs a few hours in the fridge to firm up properly. It sets surprisingly quickly thanks to the chocolate content, so you’ll have beautifully solid pieces in as little as three hours. If your kitchen is cool, you can even leave it at room temperature to set overnight, though it may take a little longer.
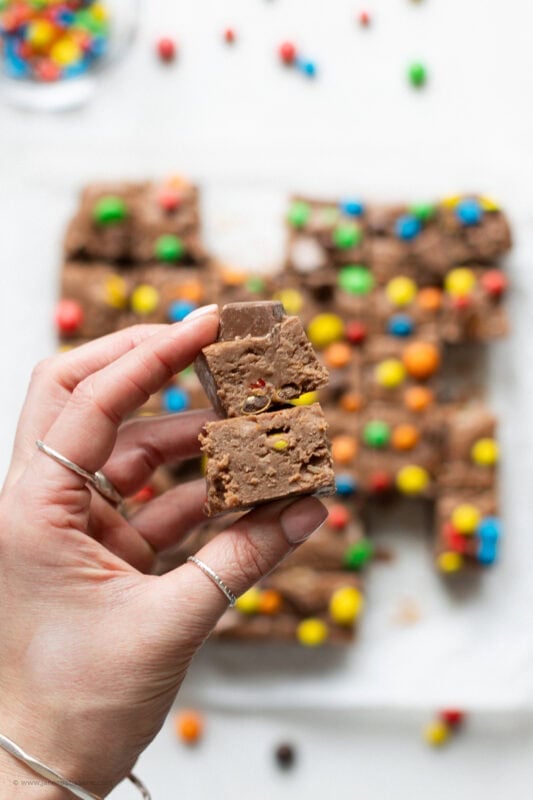
When slicing, using a long, sharp knife dipped in hot water and dried between cuts helps produce smooth edges. This method prevents the chocolate layer from cracking and ensures each square looks neat and uniform. You can cut large chunks for gift boxes or smaller, bite-sized pieces for sharing at events.
Because this fudge is thick and smooth, it holds its shape wonderfully once sliced. It stores well, packs easily into boxes or jars, and keeps its texture for up to two weeks. It’s a reliable recipe that tastes as good on day ten as it does on day one.
Tin and gift ideas!
I use a 9″ square tin for fudge as it gives a nice depth! The best bit about tray bakes such as fudge is you can portion it however big or small you like to make it fit your numbers. You can also double the quantities relatively easily so its perfect when wanting to make large batches!
Last minute gift idea needed?! Say no more – this looks great packaged in clear bags, little kraft boxes or even jars! Its always around Christmas time I make big batches of all different flavoured fudge and everyone gets a little variety box – its a sure crowd pleaser.
This fudge has become one of my go-to recipes during busy holidays when I want something impressive but don’t have hours to spare. It’s versatile, crowd-pleasing and always appreciated. Plus, the combination of chocolate and sweets makes it appealing to both adults and children.
Tips & tricks
- I like using the mix of milk & white chocolate as it makes a lighter flavour, but you can use whatever type of chocolate you want such as dark and milk or just milk etc.
- This can be stored in an airtight container for 2 weeks once made – I keep mine in the refrigerator when hot, but room temperature is fine also.
- I recommend using this tin.
Easy Microwaveable Fudge!
Ingredients
- 397 g condensed milk (one tin)
- 600 g chocolate (I used 300g milk and 300g white)
- 2 bags M&Ms (I used a mixture of chocolate M&Ms and brownie M&Ms)
- Mini Rolos
Instructions
- Line a 7x11" tray with parchment paper and leave to the side of now.
- In a large microwaveable bowl pour the condensed milk and chopped chocolate
- Microwave in 20-30 second bursts until it is all melted - stir each time! (My microwave is a 1000 watt microwave so is very powerful, it took 1 and a half minutes for it to be done!)
- Once it is all melted together, make sure its mixed thoroughly and pour in your chosen chocolate sweets.
- Mix once again so they're distributed evenly and pour into the prepared tin and refrigerate for 3-4 hours until set (you can set it at room temperature, but it might take overnight!)
- Remove from the tin and portion into squares! If they're still a bit soft then refrigerate again for a couple more hours!
Notes
- I like using the mix of milk & white chocolate as it makes a lighter flavour, but you can use whatever type of chocolate you want such as dark and milk or just milk etc.
- This can be stored in an airtight container for 2 weeks once made - I keep mine in the refrigerator when hot, but room temperature is fine also.
- I recommend using this tin.
This is fantastic to make with grandchildren, tastes delicious. Will it freeze x
Yes, it will freeze!
Due to food allergies can’t use condensed milk. How do I make vegan fudge? Thanks 😊
Hi Jane! You memtion 2 bags of mnm’s but what size bag do you use for this recipe? Thank you!
[…] done little changes to her recipe as I don’t like m&m. You can find the original recipe here and ofcourse many more lovely cakes and […]
And the chocolate too as I like the plain fudge!
Hiya – you can leave the sweets out, but not the chocolate – its essential in this recipe. If you like plain fudge I recommend my Clotted Cream and white chocolate fudge, but leave the chocolate out on that recipe 🙂
Ok will look for the clotted cream ! Thanks!
It’s very yummy 🙂 it’s okay!
Hi Jane – can I leave out the m ‘n m’s and make it a normal fudge?
They look good – both for me and my son! I’m definitely going to try! 🙂
Haha Im so glad! And yes please do! 🙂
Hi Jane, a quick question – I was trying them today, could you please reconfirm the quantity of chocolate..you mentioned as 550gm (but added 250+200 as u wrote) I added 550gm for now! 🙂
Oh golly gosh sorry, my mistake! I shall correct that when I’m home later – it should be 500g (but using 550g won’t make a difference!) 🙂 apologies!
No worries at all, I just wanted to confirm! I realised I didn’t had enough so used 400 🙂 Thanks again and I will update you when I taste – can’t wait ( settling at room temperature) Thanks again for the recipe! 🙂
Ohhh okay I’m sure it’ll still work perfectly fine 🙂
It came out awesome!!! Thanks so much for the recipe!! I’m going to post it soon! 🙂
Okay sounds good – please link back to my account when you post it! 🙂
I was going to ask that if I can tag you! Thanks again for the recipe! 🙂
I love easy recipes like this – brilliant! 🙂
Me too – I can’t tell if its just because I’m lazy or not, but they’re so good!! 😀